Listen to this podcast [1:17]-->
powered by ODEO
Wow! Congratulations!! You’ve reached the 23rd thing. Be sure to give yourself a pat on the back for completing the program. Your reward for completing this journey is a useful and handy MP3 player. But before awarding this to you, I ask for one last discovery post.
For your last and final exercise for this program please reflect on your learning journey and post a few thoughts. Here are some questions to prompt you if you're drawing a blank ...
*What were your favorite discoveries or exercises on this learning journey?
*How has this program assisted or affected your lifelong learning goals?
*Were there any take-aways or unexpected outcomes from this program that surprised you?
*What could we do differently to improve upon this program’s format or concept?
And last but not least…
*If we offered another discovery program like this in the future, would you again choose to participate?
In closing, we want to thank each and every one of you for joining us on this journey. Our greatest hope is that this is not the end of our learning journey together as a staff and a system, but rather it’s just the start of something amazing …
Thank you,
The TACkies Committee
Tuesday, October 2, 2007
#22 Audiobooks (or "The end is in sight ")
With your new MP3 player right around the corner, it’s time to take a look around the Greater Phoenix Digital Library and downloadable Overdrive audiobooks.
The Scottsdale Public Library is part of the Greater Phoenix Digital Library, a consortium with Phoenix, Glendale, Tempe, Chandler and Apache Junction Public Libraries. This provides eBooks, eAudiobooks, music, and video available for downloading into a PC, PDA or MP3 player, through a company called Overdrive.
For this exercise, you will need:
* Home computer
* Internet connection
* Scottsdale Public Library card and PIN
* Compatible MP3 player (optional)
Then, get an idea of the types of titles you can find here. Take a look around and locate a few titles of interest. That MP3 player is right around the corner and once you have it, you’ll definitely have a reason to try out this popular library service.
Discovery Resources:
For this discovery exercise, you need to familiarize yourself a bit with the structure of Overdrive's Downloadable audiobooks site.
Discovery Exercise:
Create a blog post about your findings. Did you locate a title that you might want to try out and download once you have your player? OPTIONAL: Try downloading a title from the Greater Phoenix Digital Library. You don’t have to have a portable player to listen to audiobooks, you can also listen to it from a home computer.
#21 Podcasts, Schmodcasts!
Listen to this podcast [2:17]-->
powered by ODEO
The word podcast is used to refer to a non-musical audio or video broadcast that is distributed over the Internet. What differentiates a podcast from regular streaming audio or video is that the delivery method for podcasts is often done automatically through RSS.
In 2005, "podcast" was named the "word of the year" for 2006 by New Oxford American Dictionary and with the growth of podcasting over the last 24 months, it's easy to see why.
Podcasts take many forms, from short 1-10 minute commentaries (like the ones used in this Learning 2.0 program) to much longer in person interviews or panel group discussions. There’s a podcast out there for just about every interest area and the best part about this technology is that you don’t have to have an iPod or a MP3 player to access them. Since podcasts use the MP3 file format, a popular compressed format for audio files, you really just need a PC (or portal device) with headphones or a speaker.
iTunes, the free downloadable application created by Apple is the directory finding service most associated with podcasts, but if you don’t have iTunes installed there are still plenty of options.
For this discovery exercise participants are asked to take a look at some popular podcast directory tools. Do some exploring on your own and locate a podcast that is of interest to you. Once found, you can easily pull the RSS feed into your Bloglines account as well, so that when new casts become available you’ll be automatically notified of their existence.
Discovery Resources:
*To find out more about podcasts start with this What is a Podcast? tutorial
*There are many, many podcast directories and finding tools out there. Here are just three of the more popular ones that, unlike iTunes, don't require a software download:
*Podcast.net
*Podcastalley.com
*NPR's Podcasts
*Learn Out Loud
*What? You want to learn how to be a podcaster too? (Optional Resources for those who want to learn to create podcasts)
*Feedburner's guide to publishing your podcast
*Making a Podcast with Blogger
*Odeo’s Studio – online recording studio.
*Check out the video tutorials on Audacity from "How to Podcast"
Discovery Exercise:
1) Take a look at one or two of the podcast directories listed and see if you can find a podcast that interests you. See if you can find some interesting library related podcasts here, like book review podcasts or library news.
2) Add the RSS feed for a podcast to your Bloglines account
3) Create a blog post about your discovery process. Did you find anything useful here?
Optional: If you're ambitious, why not try out the Gabcast service and add an audio post about your experience to your blog. Or checkout a video podcast (alternately known as vlogs) such as author John Green's Brotherhood 2.0.
#20 You Too Can YouTube
Listen to this podcast [1:58]-->
powered by ODEO
Within the past year online video hosting sites have exploded allowing users to easily upload and share videos on the web. Among all the web 2.0 players in this area, YouTube is currently top dog serving up over 100 million video views a day and allowing users not only to upload their own video content easily, but also to embed clips into their own sites easily.
Do some searching around YouTube yourself and see what the site has to offer. You'll find everything from 1970s TV commercials and 60s kid's show theme songs to library dominos to iACPL 3.0 and old MST3K clips featuring government-sponsored films. Of course, like any free site, you’ll also find a lot of stuff not worth watching too. But that doesn’t mean you shouldn’t explore and see for yourself what the site has to offer. :)
Discovery Exercise:
1) Explore YouTube & find a video worth adding as an entry in your blog.
2) Create a blog post about your experience. What did you like or dislike about YouTube and why did you choose the video that you did? Can you see any features or components of the site that might be interesting if they were applied to library websites?
OPTIONAL: Try placing the video inside your blog using the copy and paste code for the "Embeddable Player.” Note: you'll need to use Blogger's Edit HTML tab when pasting this code.
Other popular video hosting sites:
*Yahoo Videos
*Google videos
#19 Discovering Web 2.0 Tools
[Sorry, no podcast for this "thing." You'll have to exercise your eyes instead.]
Throughout the course of this Learning 2.0 program we’ve explored just a small sampling of these new internet technologies and websites that are empowering users with the ability to create and share content. But given time there are so many more we could explore. Current estimates place the number of web 2.0 tools at somewhere between 300 & 500 with only a handful emerging as market dominators. And although time will only tell which of these new collaborative, social networking and information tools will remain on top, one thing is for sure, they're not going to go away (at least at any time soon).
For this discovery exercise, participants are asked to select any site from this list of Web 2.0 Awards nominees and explore it. With so many to choose from, it might be handy to first select a category that interests you (like Books or Personal Organization) and then simply select a tool/site to explore. Be careful to select a tool that is Free and that doesn't require a plug-in or download. The majority of these are free so this shouldn’t be a problem.
Discovery Exercise:
1) Select any site/tool from the list of Web 2.0 Awards nominees. (If you prefer to select from just the winners, here’s a link to the short list.)
2) Explore the site you selected.
3) Create a post about your discovery. What did you like or dislike about the tool? What were the site’s useful features? Could you see any applications for its use in a library setting?
Web 2.0 – with so much to explore, just start with ONE. :)
#18 Web-based Apps: They're not just for desktops
The availability and use of online productivity web-based applications (think word processing and spreadsheets) has exploded over the past two years and for good reasons! These powerful applications provide users with the ability to create and share documents over the internet without the need of installed desktop applications. Some experts speculate that this emerging trend may mean the death to Microsoft Office and other software-based productivity tools, while others think web-based applications have their place, but not in the office. But no matter which side of the office suite platform you side with, on this both sides seem to agree; web-based apps have their place.
One large benefit to web-based applications it that they eliminate the need to worry about different software versions or file types as you email documents or move from PC to PC. Another bonus is that they easily accommodate collaboration by allowing multiple users to edit the same file (with versioning) and provide users the ability to easily save and convert documents as multiple file types (including HTML and pdf). And, you can even use many of these tools, such as Zoho Writer and Google Docs to author and publish posts to your blog. It’s this type of integration with other web 2.0 tools that also makes web-based apps so appealing.
For this discovery exercise, participants are asked to take a look at a web-based word processing tool called Google Docs, create a simple document and then document your discoveries in your blog. If you're up to the challenge, you might even export your document as an HTML file or publish it through Google Docs to your blog.
With Google Docs and web-based applications, the possibilities are endless.
Discovery Resources:
A short list of web-based productivity applications.
Discovery Exercise:
Create a free account for yourself in Google Docs.
Explore the site and create a few test documents or two.
Try out Google Docs features and create a blog post about your discoveries.
#17 Playing Around with PBWiki
"Sandbox" is the term that wikis often use to describe the area of the website that should be used for pure play. For this discovery and exploration exercise, we’ve set up a whole Learning 2.0 Favorites wiki* that’s for nothing but play!
For this “explore-and-play-with-wikis” exercise, you are asked to add an entry or two to the PBwiki Learning 2.0 wiki. The theme of this wiki is simply “Favorites” : Favorite books, favorite vacation spots, favorite restaurants, favorite anything …all you need to do is play and add your thoughts. To mark your adventure on this site, you should add your blog to the Favorite Blogs page.
Discovery Resources:
*PBWiki Video Gallery - Short videos of PBwiki features
*PB Wiki Tips
Discovery Exercise:
1) Access the SPLS Learning 2.0 Wiki and create a login account for yourself.
2) Add your input on one or more of the existing pages. That's how we'll know that you've been there.
First, click on the page you wish to edit. Then click "edit page." (you may be prompted to log in to the wiki if you haven't already. Use the password above.
It’s easy to add a link if you follow this simple syntax:
Example:
[URL Title of blog]
[http://plcmclearning.blogspot.com Learning 2.0]
With brackets [ ] and just a little typing, you’ve added a link - yup, it’s as easy as that!
You can also add a link to anything you type by highlighting the words you wish to link to and clicking on the link icon in your editing tool bar. Once there, you choose "URL" from the top pop-up box's drop-down box and type in the address to the website.
OPTIONAL: Add a favorite or two to a few other pages (Favorite books, favorite vacation spot, etc). And, if you feel up to the challenge, you might even want to create a separate page for book review or short travel essay and link up to that.
3) Create a post in your blog about the experience.
* NOTE: The SPLS Learning 2.0 Wiki was created using the free version of PBWiki, a tool that lets you create webpages that anyone can edit.
#16 So what’s in a wiki?
Listen to this podcast [1:49]-->
powered by ODEO
A wiki is a collaborative website and authoring tool that allows users to easily add, remove, and edit content. Wikipedia, the online open-community encyclopedia, is the largest and perhaps the most well known of these knowledge sharing tools. With the benefits that wikis provide, the use and popularity of these tools is exploding.
Some of the benefits that make wikis so attractive are:
*Anyone (registered or unregistered, if unrestricted) can add, edit or delete content.
*Tracking tools within wikis allow you to easily keep up on what has been changed and by whom.
*Earlier versions of a page can be viewed and reinstated when needed.
*And users do not need to know HTML in order to apply styles to text or add and edit content. In most cases simple syntax structure is used.
As the use of wikis has grown over the last few years, libraries all over the country have begun to use them to collaborate and share knowledge. Among their applications are pathfinder or subject guide wikis, book review wikis, ALA conference wikis, and even library best practices wikis.
Discovery Resources:
Use these resources to learn more about wikis:
*Wiki, wiki, wiki - from PLCMC's own Core Competency blog
*Wiki’s: A Beginner’s Look – an excellent short slide presentation that offers a short
introduction and examples.
*What is a Wiki? – Library Success wiki presentation
*Using Wikis to Create Online Communities – a good overview of what a wiki is and how it
can be used in libraries.
Discovery Exercise:
1) For this discovery exercise, you are asked to take a look at some library wikis and blog
about your finding. Here’s a few examples to get you started:
*SJCPL Subject Guides – a pathfinder wiki developed by the St. Joseph County Public
Library system
*Book Lovers Wiki - developed by the Princeton Public Library
*Library Success: A best practices wiki
*ALA 2006 New Orleans wiki – an example of a wiki created to support a specific event
*The Bull Run Library wiki - a public library wiki and also a Learning 2.0 participant
*Other library wiki examples
2) Create a blog post about your findings. What did you find interesting? What types of
applications within libraries might work well with a wiki?
So what's in a wiki? Find out by doing some exploring on your own.
#15 On Library 2.0 & Web 2.0 ...
Listen to this podcast [1:37]-->
powered by ODEO
Library 2.0 is a term used to describe a new set of concepts for developing and delivering library services. The name, as you may guess, is an extension of Web2.0 and shares many of its same philosophies and concepts including harnessing the user in both design and implementation of services, embracing constant change as a development cycle over the traditional notion of upgrades, and reworking library services to meet the users in their space, as opposed to ours (libraries).
Many have argued that the notion of Library 2.0 is more than just a term used to describe concepts that merely revolve around the use of technology; it is also a term that can be used to describe both physical and mindset changes that are occurring within libraries to make our spaces and services more user-centric and inviting. Others within the profession have asserted that libraries have always been 2.0: collaborative, customer friendly and welcoming. But no matter which side of the debate proponents fall, both sides agree that libraries of tomorrow, even five or ten years from now, will look substantially different from libraries today.
Discovery Resources:
OCLC Next Space Newsletter – Web 2.0: Where will the next generation of the web take libraries?
Five Perspectives:
*Away from Icebergs
*Into a new world of librarianship
*To more powerful ways to cooperate
*To better bibliographic services
*To a temporary place in time
Wikipedia – Library 2.0
Library 2.0 Discussions (list of great references from Wikipedia)
Discovery Exercise:
1) Read two or three of the perspectives on Library 2.0 from the list above.
2) Create a blog post about your thoughts on any one of these. Library 2.0 - It's many things to many people.
3) What does it mean to you?
#14 Getting not-so-technical with Technorati
Listen to this podcast [2:46]-->
powered by ODEO
So now that you’ve been blogging for awhile, you might be wondering just how big the blogosphere is. Well, according to Technorati, the leading search tool and authority for blogs, the number of blogs doubles just about every 6 months with over 51 million blogs currently being tracked by the site. If the blogging trend continues, it is estimated that Technorati will have tracked its 100 millionth blog in just 5 months.
Yes, these numbers are astounding, but as you’ve already seen for yourselves, blogging is so easy that these publishing tools are being taken advantage of by almost every industry, including libraries.
So how does a person get their blog listed as part of the blogosphere and how can you tag your posts with keywords to make them more findable through a Technorati search? The answer to the first question is that your blog is probably already being captured by Technorati due to the fact that you're already using Blogger, the most popular blogging tool. But if you want to join the party and have your blog officially listed on Technorati and also take advantage of the watchlist and other features, you’ll need to claim your blog yourself. As for tagging posts with Technorati tags? This is easy, too. All you need to do is add a little bit of HTML code to the bottom of your post (see my example below) and Technorati will pick up these tags when it spiders (or web crawls) your site.
There are a lot of new features that have been added to Technorati this past summer, including new ways to search for blogs. You can search for keywords in blog posts, search for entire blog posts that have been tagged with a certain keyword, or search for blogs that have been registered and tagged as whole blogs about a certain subject (like photography or libraries).
Discovery Resources:
Technorati Tour – videocast of new features & new look
Technorati Discover & Popular features
Discovery Exercise:
1) Take a look at Technorati and try doing a keyword search for “Learning 2.0” in Blog posts, in tags and in the Blog Directory. Are the results different?
2) Explore popular blog, searches, and tags. Is anything interesting or surprising in your results?
3) Create a blog post about your discoveries on this site.
OPTIONAL: If you're up for a challenge, learn how to tag your posts with Technorati tags so they can join tag searches. Create a post about something. It can be anything you want and add the HTML code to the bottom to tag it as “PLCMCL2.” You may also want to consider claiming your blog and creating a watchlist. NOTE: When adding HTML code, you'll want to make sure you're in Blogger's Edit HTML window.
There's a lot to explore.
Technorati Tag: PLCMCL2
#13 Tagging, folksomonies & social bookmarking in Del.icio.us
Listen to this podcast [3:53]-->
powered by ODEO
Tagging is an open and informal method of categorizing that allows users to associate keywords with online content (webpages, pictures, & posts). Unlike library subject cataloging, which follows a strict set of guidelines (i.e., Library of Congress subject headings), tagging is completely unstructured and freeform, allowing users to create connections between data any way they want.
In the past few weeks, we’ve already explored a few sites – Flicker and LibraryThing to name two -- that allow users to take advantage of tagging and in week 3, many even used a common tag (SPLS) to create an association between photos that we individually uploaded. This week, in addition to exploring Technorati tagging, we want to also look at a popular social bookmarking site called Del.icio.us (typed in as http://del.icio.us/).
Del.icio.us is a social bookmarking manager which allows you to bookmark a web page and add tags to categorize your bookmarks.
Many users find that the real power of Del.icio.us is in the social network aspect, which allows you to see how other users have tagged similar links and also discover other websites that may be of interest to you. You can think of it as peering into another users’ filing cabinet, but with this powerful bookmarking tool each user's filing cabinet helps to build an expansive knowledge network.
For this discovery exercise, you are asked to take a look at Del.icio.us and learn about this popular bookmarking tool.
Discovery Resources:
*Otter Group Del.icio.us tutorial (8 min video) - Highly recommended!!!
*Us.ef.ul: A beginners guide to Del.icio.us
*Several Habits of wildly successful Del.icio.us users
Discovery Exercise:
View the 8 minute Del.icio.us tutorial to get a good overview of its features.
Take a look around Del.icio.us using the PLCMCL2 account that was created for this exercise. Note: In this account you will find lots of resources that have been highlighted or used throughout the course of the Learning 2.0 program.
Explore the site options and try clicking on a bookmark that has also been bookmarked by a lot of other users. Can you see the comments they added about this bookmark or the tags that they used to categorize this reference?
Create a blog post about your experience and your thoughts about this tool. Can you see the potential of this tool for research assistance? Or just as an easy way to create bookmarks that can be accessed from anywhere?
OPTIONAL: If you’re up to the challenge, create a Del.icio.us account for yourself and discover how this useful bookmarking tool can replace your traditional browser bookmark list. You might even want to explore Del.icio.us’ latest addition, a network badge. (Psst! See it over there at the end of the navigation sidebar)
Note: If you do set up a Del.icio.us account, here’s a quick word about the Del.icio.us Buttons. On PCs that have the toolbars locked down, these will install as options in your browser bookmarks.
Use the “Post to my Del.icio.us” link to add the current webpage to your account (you may need to log in). Use the “My Del.icio.us” link to view your online account.
#12 Getting to Know You - MySpace & Facebook
Let's turn our attention to two of the largest social networking sites on the web - MySpace and Facebook.
You probably know of MySpace as the site most kids and teens are glued to after school. But what's the attraction? At MySpace, you can rediscover old friends, meet new people who share your interests, discover new music, watch videos, keep a blog, inform your friends of upcoming events, share photographs, send messages to others, join groups based on anything under the sun, fall in love, play games, search the classifieds, watch a film trailer, and be a groupie. It is a world within itself, with all the trials and treasure of real life. It's even being used by the police and fbi to solve crime.
Facebook is very similar to MySpace in concept. It originally was marketed to the college crowd and continues to draw in this older age group. Here's an article with a nice graphic that breaks down how Facebook users spent their time in August 2007. Facebook has a cleaner look to it overall than MySpace and seems a bit more private as well. With Facebook, you are often asked to confirm facts that someone posts about you, such as when and how you met someone. This certainly makes you feel a bit more connected to someone instead of just clicking a button that marks a person as a friend.
You receive a lot less junk mail through Facebook than Myspace, particularly from artists looking to expand their listening base. However, Myspace has just recently added some new options to make it easier to avoid unwanted friend requests and other spam. Which of these two sites is better? That depends completely on the user. Some use both to cover all their networking needs - MySpace for friends and family and Facebook for professional contacts.
Discovery Exercise
1. Explore MySpace or Facebook. (Optional: Make an account for yourself at MySpace and/or Facebook. Feel free to put in fake information if you're concerned about your privacy. You will need to give them a real email address, however, in order to verify the account(s).)
2. Search for someone - in Facebook, someone you know; in MySpace, a friend, author, library, band, etc. Even books and movies sometimes have their own pages.
4. If you are in MySpace, use the search engine to look for libraries that have their own pages.
5. Post in your blog about your experience using a social networking site. What did you like or not like about the site? How do you think these sites might be useful to libraries?
#11 A Thing About LibraryThing
Listen to this podcast [1:52]-->
powered by ODEO
Are you book lover or cataloger at heart? Or do you enjoy finding lost and forgotten gems on the shelf to read? Then LibraryThing may be just the tool for you. Developed for booklovers, this online tool not only allows you to easily create an online catalog of your own it also connects you to other people who have similar libraries and reading tastes. Add a book to your catalog by just entering the title -- It’s so easy that you don’t even need MARC record training to do it – or connect with other users through your similar reading tastes. There are lots of ways to use LibraryThing. You can even view your books on a virtual shelf, add a widget to display titles that are in your catalog, or install a LT Search box on your blog.
So why not join the ranks and create your own library online? With over 65,000 registered users (BTW-LibraryThing also has a group forum for librarians) and over 4.7 million cataloged books, you're bound to discover something new.
Discovery Resources:
About LibraryThing
Library Thing tour
LibraryThing blog (updates & news)
Discovery Exercise:
1. Take a look around LibraryThing and create an account.
2. Add a least 5 books to your library.
3. Blog about your findings and be sure to link to your LibraryThing catalog.
#10 Play Around With Image Generators
 Listen to this podcast [1:00]-->
powered by ODEO
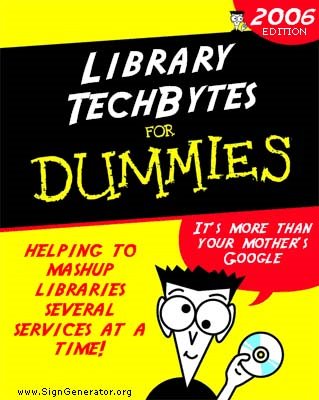
Generators? No, I’m not talking about those gas powered back-up things. The generators I’m talking about allow you to easily manipulate image and graphics to create fun images like these:
For this discovery exercise, we just want you to have fun. Find a few fun image or text generators to play around with and write a post in your blog about one of your favorites and display the result. Often adding the image you mocked up to your blog is as simple as copying and pasting code that the page provides. If not, you may just need to right click on the image and then save it to your hard drive before using Blogger’s image button to add it to your post.
If you’re having difficulty getting your image added to a post in your blog, ask a co-worker for help.
Discovery Resources:
The Generator Blog
Letter James
FD Toys
Also try searching for online generators, text generators or image generators!
Discovery Exercise:
1. Play around with some image generators and find one that you like.
2. Post the result of your discovery process in your blog.
Note: Be sure to include a link to the image generator itself, so other participants can discover it too.
So take some time and have fun with this exercise. And remember to be tasteful too! Images can be created with Dummies Book Generator, FD Toys Magazine Cover, Comic Strip Generator.
#9 Finding Feeds
Listen to this podcast [3:08]-->
powered by ODEO
* The podcast for this "thing" mentions Feedster which has recently ceased operations.
Please use one of the tools listed in the discovery section.
Now that you have a newsreader (your Bloglines account), you can begin adding other newsfeeds that interest you. There are several ways you can locate newsfeeds:
*When visiting your favorite websites -- look for news feed icons that indicate the website provides it. Often a feed icon will be displayed somewhere in the navigation bar of the site. (Here's an image that contains a sampling of several feed icons).
*Use Blogline's Search tool - Bloglines recently expanded search tool lets you search for news feeds in addition to posts, citations and the web. Use the Search for Feeds option to locate RSS feeds you might be interested in.
*Other Search tools that can help you find feeds:
*Topix.net - This search tool allows you to locate recent newsfeed items based upon keyword or phrase searching. The tool focuses specifically on news and media outlet RSS feeds for information, not weblogs.
*Syndic8.com - Syndic8 is an open directory of RSS feeds that contains thousands of RSS feeds that users have submitted.
*Technorati - Technorati is a popular blog finding tool that lets you search for blogs. Since RSS feeds are inherent to all blogging tools, Technorati Blog Search can help you find RSS feeds for topic specific blogs you may be interested in. Additonal Resource: Technorati Tutorial on finding and adding your blog
Discovery Exercise:
1. Explore some of the search tools noted above that can help you locate some news feeds.
2. Create a blog post about your experience. Don't know what to blog about? Here are some questions to think about ...
Which method of finding feeds did you find easiest to use?
Which Search tool was the easiest for you?
Which was more confusing?
What kind of useful feeds did you find in your travels?
Or what kind of unusual ones did you find?
What other tools or ways did you find to locate newsfeeds?
EXTRA STUFF -- Feed icon information:
In Febuary of this year, the adoption of a standard feed icon among websites and browsers finally began to assist in stopping the madness and confusion caused by so many variations. So far this icon has been adopted by many websites and browers, including Opera and FireFox, where it displays in the address bar:
The next release of Internet Explorer is supposed to have this as well.
#8 Make life "really simple" with RSS & a newsreader
Listen to this podcast [5:15]-->
powered by ODEO
FYI & ICYW: This is the longest podcast in the program.
You’ve heard of RSS? You’ve seen those small funny tags on websites? You’ve heard co-workers and acquaintances swear by it, but still have no idea what RSS is? Well don’t worry, according to a recent survey you’re still in the majority, but this is changing rapidly. In the information world, RSS is not only revolutionalizing the way news, media and content creators share information, but it also is swiftly changing the way everyday users are consuming information.
RSS stands for “Really Simple Syndication” and is a file format for delivering regularly updated information over the web.
Just think about the websites and news information sources you visit every day. It takes time to visit those sites and scour the ad-filled and image-heavy pages for just the text you want to read, doesn’t it? Now imagine if you could visit all those information sources and web pages in just one place and all at the same time … without being bombarded with advertising… without having to search for new information on the page you’d already seen or read before… and without having to consume a lot of time visiting each site individually. Would that be valuable to you? Well, it’s available now through a newsreader and RSS.
This week’s discovery exercises focus on learning about RSS news feeds and setting up a Bloglines account (a free online newsreader) for yourself to bring your feeds together.
Discovery Resources:
*CNET Video: RSS – Feel the Need for Feeds (3:32) – a good over view of what RSS is and
the benefits to users.
*Feed Me: A gentle introduction to Internet feeds - a good tutorial from Palinet, a library
cooperative
*Using Bloglines Tutorial (how to keep up with dozens of blogs everyday) – This online
tutorial walks you through how to setup a Bloglines account and add newsfeeds. Follow
Steps 1 to 3 to set up your Bloglines account. Steps 4 – 9 are optional and cover how to
subscribe to different types of feeds (podcasts, Flickr albums, etc)
*Adding RSS Feeds to Bloglines - A short YouTube video that PLCMC created showing how to add feeds.
*Additional Bloglines news feed subcription information (screenshot image)
*Your co-workers - tap into their knowledge or work through your discovery process
together.
Discovery Exercise:
1. Follow the discovery resources above to learn more about RSS and newsreaders.
2. Create a free online Bloglines account for yourself and subscribe to at least 10 newsfeeds
to your reader. See Using Bloglines Tutorial steps 1-3 for instructions.
Newsfeeds:
*SPLS Learning 2.0 participants - Subscribe to several of your co-workers' feeds. This is as easy as typing the blog URL into the subscribe field in Bloglines. Try it, it's easy!
*Then try adding a few other types of news feeds from news sources and even PLCMC's Readers Club site. (Select at least 3 from the list below to subscribe to)
*The Learning 2.0 blog feed
*Charlotte.Com news feeds (pick at least one)
*PLCMC Core Compentency blog
*Reader’s Club new review feeds
*Unshelved - Library cartoon feed
3. Create a post in your blog about this exercise. Optional: If you're up to the challenge, you can provide the URL address to your public bloglines account (find where to find this below)
Don’t know what to blog about? Think about these questions:
What do you like about RSS and newsreaders?
How do you think you might be able to use this technology in your work or personal life?
How can libraries use RSS or take advantage of this new technology?
How to find your public Bloglines URL:
1. Click on the Share tab within your Bloglines account:
2. Scroll down the right screen pane and locate the public URL (see screenshot)
3. Be sure to add this as part of your post to demonstrate your completion of this activity.
In conclusion ...Here is link to Michael's public Blogline's account: http://www.bloglines.com/public/MikeSchor
PS: Once you tackle this discovery exercise, you've tackled the most difficult one of the whole 23. :)
#7 Blog about Technology
For this thing, simply blog about anything technology related. Yes, it can be anything that relates to technology! You just need to share a few thoughts.
Also, be sure to add at least one comment to another participant's blog. That's what online communities are all about - connecting and communication. :)
Also, be sure to add at least one comment to another participant's blog. That's what online communities are all about - connecting and communication. :)
#6 More Flickr Fun
Like many web 2.0 sites, Flickr has encouraged other people to build their own online applications using images found on the site. Through the use of APIs (application programming interfaces), many people have created third party tools and mashups* that use Flickr images. Here is a sampling of just a few…
* Flickr Color Pickr - lets you find public photos in Flickr that match a specific color.
* Montagr – create a photo mosaic from photos found on Flickr.
Discovery Exercise:
1. Explore some of the fun Flickr mashups and 3rd party tools that are out there.
2. Create a blog post about one that intrigues you.
Personally one of my very favorite tools is FD Toys’ Trading Card Maker. And there’s a ton of librarians out there that have created their own Librarian Trading Card.
So have some fun discovering and exploring some neat little apps. And if you're up to the challenge, why not create a trading card of your own. :)
* Mashup Note: Wikipedia offers some great articles that explain mashups. Basically, they are hybrid web applications that take features from one application (like Flickr) and mash it up with another.
#5 Discover Flickr
#5 Discover Flickr
Listen to this podcast [2:38]-->
powered by ODEO
Photo sharing websites have been around since the 90s, but it took a small startup site called Flickr to catapult the idea of “sharing” into a full blown online community. Within the past year, Flickr has become the fastest growing photo sharing site on the web and is known as one of the first websites to use keyword “tags” to create associations and connections between photos and users of the site.
For this discovery exercise, you are asked to take a good look at Flickr and discover what this site has to offer. Find out how tags work, what groups are and all the neat things that people and other libraries are using Flickr for.
Discovery Resources:
- Flickr Learn More tour (6 steps)
- Mediamazine Flickr Tutorials
- Flickr: Popular tags
- Flickr: Interesting- Last 7 days
Flickr Services (3rd party applications & mashups) and let’s not forget to look at some other libraries on Flickr
Discovery Exercise:
In this discovery exercise, you have two options…
1) Take a good look around Flickr and discover an interesting image that you want to blog about. Be sure to include either a link to the image or, if you create a Flickr account, you can use Flickr's blogging tool to add the image in your post. Another option you have for including images in your post is to use Blogger's photo upload tool.
-- OR --
2) If you're up to an easy challenge ... create a Free account in Flickr and use your location's digital camera to capture a few pictures of something in your branch. Upload these to your Flickr account and tag at least one of the images “SPLS” and mark it public. Then create a post in your blog about your photo and experience. Be sure to include the image in your post. Once you have a Flickr account, you have two options for doing this: through Flickr's blogging tool or using Blogger's photo upload feature.
So go ahead, explore the site and have some Flickr photo fun and if you're interested in looking at some photo hosting sites, then why not check out Jamie's recommendations & this Wired story. (Thanks Jamie for the link).
PS: A quick word about photo posting etiquette - When posting identifiable photos of other people (especially minors) is it advisable to get the person's permission before posting their photo in a publicly accessible place like Flickr. Never upload pictures that weren't taken by you (unless you have the photographer's consent) and always give credit when you include photos taken by someone else in your blog.
#4 Register your blog and join the party ...
If you’ve made it this far, you already have three items or “things” completed of the 23 that are required to earn the USB MP3 player.
But how do you qualify? Good question! By registering your blog and recording your progress on each of the 23 things. For the sake of simplifying this process for SPLS staff involved, you will just need to send an email to splslearning2.0@gmail.com with your name, blog address and "thing" number completed.
Starting with Thing #5, you also need to include the URL for the permanent link to each of your blog posts that capture your thoughts, comments or findings about your discovery process. And depending upon the Blogger template that you selected, the permanent link for each individual posts can be found either through the post’s title or through a link in the post's footer area that contains the date.
Click on this link to see an actual post.
#3 Grab yourself a blog in 3 steps
Now that you’ve done some exploring around this website and understand how this program will work, it’s time to setup your very own personal blog to begin recording your thoughts, discoveries and exercises in. For this program, we recommend that you use Blogger*, a popular free online blog hosting service that is extremely easy to use.
Creating a blog using Blogger takes just three steps:
1. Create an account (view screenshot)
2. Name your blog (view screenshot)
3. Select your template. (view screenshot)
Once you’ve created your blog here are two important things to know:
- *To add posts: The maintenance interface that you will use to add posts, edit or change the step-up your blog is accessed online at http://www.blogger.com/ Be sure to write down your login and password.
- *To view your blog: Your blog address is http://(xxxx).blogspot.com, (xxxx)=the unique identifier you entered in Step 2. Be sure to also write down your blog address.
If you run into problems or would like more information about blogs and using Blogger here are some discovery resources you can use:
- Freevlog’s Quicktime Tutorial: Setup a Free Blogger Blog Note: Ignore the opening comments about downloading Firefox if your PC doesn’t have it. This will work in Explorer just fine.
- Blogger’s Quick Tutorial
OK -- Now, it’s your turn...
Discovery Exercise:
- Setup a blog for yourself through Blogger.
- Add a test post or two. Note: Use one of your test posts to create an entry about the habits among the 7 and 1/2 lifelong learning habits that is easiest and hardest for you & why.
- Have fun!!!!
IMPORTANT NOTE: How you choose to identify yourself on your blog is your choice. You can blog under a screen name, anonymously, or as yourself. However, in order to qualify for the staff incentives , you will need to register by sending an email with your name and blog address to splslearning2.0@gmail.com.
Use of Blogger is only a recommendation. If there is another blog hosting site that you are more comfortable with, please feel free to use it.
#2 Lifelong Learning
Listen to this podcast [1:31]-->
powered by ODEO
Among libraries, lifelong learning is one of those core values we shelve our books by. So it makes sense that before we embark on this new online learning and discovery journey that we should take a few minutes to review a few habits that can assist in creating lifelong learners.
These habits, which we’ve called the Seven and 1/2 Habits of Highly Successful Lifelong Learners, will provide you with a refresher on what it means to be a lifelong learner.
Discovery Exercise:
1) Make sure you have headphones or speakers attached to your computer.
2) Open up PLCMC's 7 & 1/2 Habits online tutorial and view the online tutorial.
* (The contract you create at the end of the tutorial is for your reference and does not
need to be submitted)
3) As you watch and listen, write down which habit among the 7 & 1/2 that is easiest for you and which is hardest. You will use your personal blog (which you will set up next) to post your thoughts about lifelong learning.
Have fun! If you haven't jumped on board yet, it's never too late to become a lifelong learner.
PS: Sorry for the discrepancy between the podcast and online tutorial. The tutorial is actually 14 minutes. In the final preparation of the tutorial, there was just too much information to cut it down. :)
Next Up: Creating your blog so you can begin tracking your journey.
#1 Discovery has never been so much fun ...
Welcome to the SPLS Learning 2.0 program & blog. Our Learning 2.0 programming is modeled after PLCMC's Learning 2.0 program & blog. You'll notice that many of our exercises are based off of PLCMC, so we have to give credit where credit is due!
Chances are if you've found your way here you're:
1) A member of SPLS's staff who is participating in the Learning 2.0 Program.
2) Interested in learning about and playing around (yes, playing is allowed in libraries) with some new Web 2.0 tools that will help you expand your information literacy toolbox.
- and/or -
3) Just interested in earning a cool USB MP3 player!
Either way… we're glad you're here!!
Learning 2.0 is an online learning program that encourages staff to learn more about emerging technologies on the web that are changing the way people, society and libraries access information and communicate with each other.
This website highlights “23 Things” and discovery exercises to help staff become familiar with blogging, RSS news feeds, tagging, wikis, podcasting, online applications, social networking and video and image hosting sites.
So fasten your seat belts, grab your mouse and get ready for a discovery adventure… and remember, it's OK to play in the library and have fun!
23 Learning 2.0 Things
Week 1: Introduction
1) Read this blog & find out about the program.
2) Discover a few pointers from lifelong learners and learn how to nurture your own learning process.
Week 2: Blogging
3) Set up your own blog & add your first post.
4) Register your blog and begin your Learning 2.0 journey.
Week 3: Photos & Images
5) Explore Flickr and learn about this popular image hosting site.
6) Have some Flickr fun and discover some Flickr mashups & 3rd party sites.
7) Create a blog post about anything technology related that interests you this week.
Week 4: RSS & Newsreaders
8) Learn about RSS feeds and setup your own Bloglines newsreader account.
9) Locate a few useful library related blogs and/or news feeds.
Week 5: Play Week
10) Play around with an online image generator.
11) Take a look at LibraryThing and catalog some of your favorite books.
12) Get to know your fellow libraries, librarians and customers with MySpace and Facebook.
Week 6: Tagging, Folksonomies & Technorati
13) Learn about tagging and discover Del.icio.us (a social bookmarking site)
14) Explore Technorati and learn how tags work with blog posts.
15) Read a few perspectives on Web 2.0, Library 2.0 and the future of libraries and blog your thoughts.
Week 7: Wikis
16) Learn about wikis and discover some innovative ways that libraries are using them.
17) Add an entry to the Learning 2.0 SandBox wiki.
Week 8: Online Applications & Tools
18) Take a look at some online productivity (word processing, spreadsheet) tools.
19) Explore any site from the Web 2.0 awards list, play with it and write a blog post about your findings.
Week 9: Podcasts, Video & Downloadable audio
20) Discover YouTube and a few sites that allow users to upload and share videos.
21) Discover some useful search tools for locating podcasts.
22) Take a look at the titles available through Greater Phoenix Digital Library and learn how to download audiobooks.
23) Summarize your thoughts about this program on your blog.
Subscribe to:
Comments (Atom)